
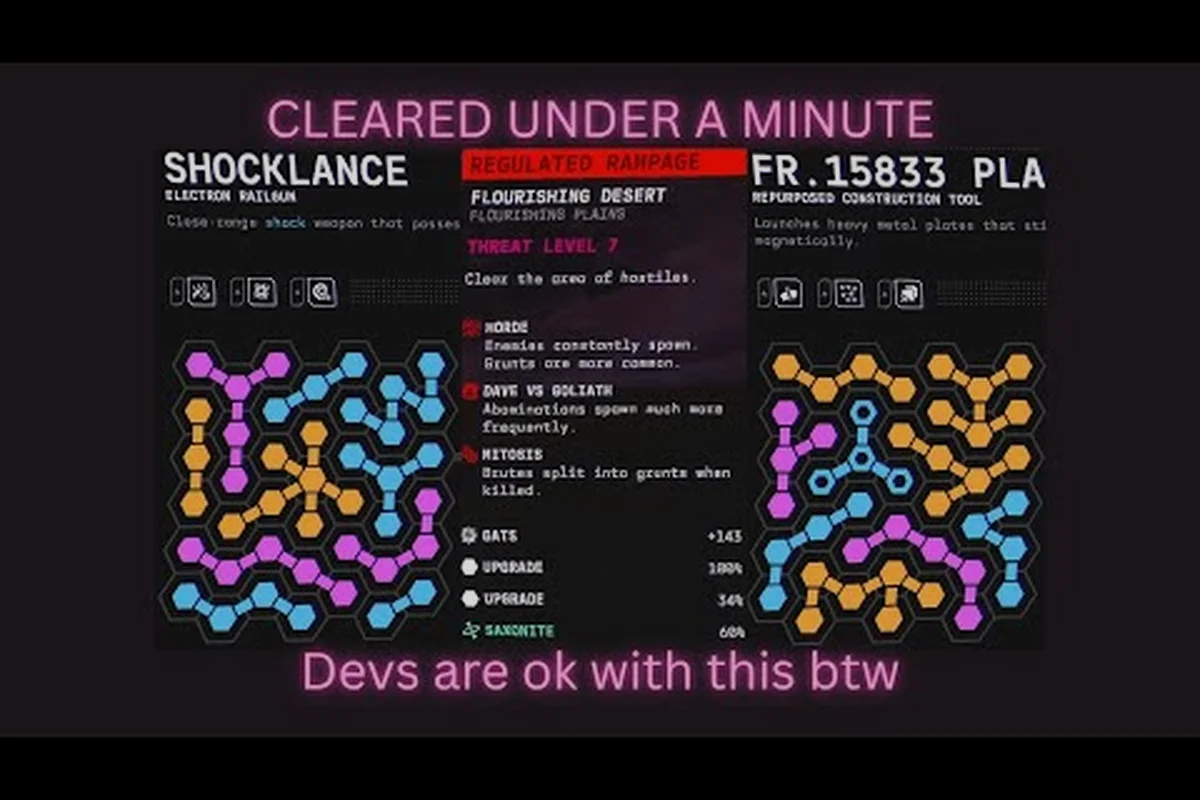
A smart build in Mycopunk starts with the hex-pattern Upgrade Grid, where the size of the pattern you infuse into a slot scales most stat bonuses at the 1.0 launch. Drop sources, rarity rotations, and Antimass costs all feed into the same loop: pick a playstyle, chase the right upgrade drops, and spend resources only on upgrades that actually move your stats. This upgrade build guide walks through every layer of that loop — the rarities, the farm routes, the stat mechanics, and the optimizer rules experienced players use to build around the pattern-size change in version 1.0.
Understanding Mycopunk's Upgrade System
Mycopunk's upgrade layer is a hex-grid board built around the Pattern Infuser in the orbital HUB. Each upgrade you collect drops as a hex tile with its own rarity, stat roll, and a hex-shaped footprint. When you slot a tile into the grid, its stats apply to the connected employee, and a larger infusion footprint buffs those stats further. According to the Pigeons at Play 9/11/26 devlog, "most upgrade stats are affected by the size of their upgrade patterns, which balances out being able to make large upgrades much smaller while also buffing upgrades when a larger pattern is infused into them." The change is the single biggest build lever added in 1.0.
Upgrade Rarities and Rotation Unlocks
The grid has a fixed rarity ladder, and your employee level controls which tiers can actually drop for you — Standard is the floor, Exotic+ is the ceiling, and two tier-locked rarities (Contraband and Oddity) are reserved exclusively for the Ouroboros roguelike mode, making them invisible to anyone skipping that endgame loop. Because drops are gated by the same level thresholds that unlock rotation slots (3, 8, 16, 30), a fresh hire cannot chase Epic or Exotic stat budgets on the upgrade farm until they grind the prerequisite missions, and any Exotic+ tile earned before level 30 is effectively borrowed progress rather than a permanent ladder step.
| Rarity | Drop Source | First Available At | Notes |
|---|---|---|---|
| Standard | Any mission | Employee level 3 | Baseline; fills empty hexes cheaply |
| Rare | Most mission types | Employee level 8 | Mid-tier stat budget |
| Epic | Threat 4+ missions, high-density runs | Employee level 16 | Strong stat rolls; build backbone |
| Exotic | Strange Components spend (Turbocharge) | Variable | Replaces an existing slot |
| Exotic+ | Endgame patterns and high-roll Infusions | Employee level 30 | Top-end budget |
| Contraband | Ouroboros runs only | Ouroboros access | Cannot be scrapped (verify) |
| Oddity | Common in Ouroboros | Ouroboros access | Frequent rolls, exotic themes |
| Broken Frame | Pattern failure, salvage | Any tier | Cannot be scrapped; placeholder tile |
Rotation unlocks sit at level 3, 8, 16, and 30 — exactly the four employee-level thresholds that gate the rarity ladder. Past level 30 the rotation stays at Exotic+, so the post-cap chase is pure stat optimization, not new tile colors.
The Pattern-Size Stat Mechanic (1.0 Change)
Before 1.0, two upgrades with the same stat number behaved identically regardless of how many hexes they covered. After the 9/11/26 devlog patch, most stats scale with the size of the upgrade pattern you slot in. A four-hex upgrade placed over a one-hex footprint still works, but its stats stay tied to its one-hex base; a one-hex upgrade placed over a four-hex footprint (a "larger pattern infused into" it) gets the larger stat budget. Upgrades whose stats depend on surrounding cells — chain triggers, adjacency bonuses, "nearby ally" effects — are explicitly excluded from this change.
Two implications follow immediately for the build optimizer: every Mycopunk upgrade build that worked pre-1.0 needs a pattern-size audit before slotting, because a four-hex Fire Spread token dropped on a one-hex footprint silently halves its projected DPS in your upgrade stats sheet, and conversely infusing a compact buff (like a 1-hex regen node) into a four-hex shell lets it inherit a stat budget closer to your damage-scaling upgrades. The upgrade optimizer no longer just compares numbers — it compares numbers per hex occupied.
-
Compact upgrades for adjacency effects, large patterns for raw stats. Use a small hex when the tile is a trigger, use a large hex when the tile is a stat stick.
-
Pattern size becomes a build currency. You can no longer treat the grid as a flat inventory of numbers; the hex layout itself is part of the upgrade stats conversation.
The developer has not published the exact per-tier size multiplier, so anyone quoting a percentage is guessing. Treat pattern-size scaling as a "more is more" curve, not a fixed 1.4× or 2× bump. In practice, your upgrade optimizer should model each pattern tier as a separate unknown variable: assign placeholder coefficients (e.g. 1.0× at one hex, 2.5× at four hexes, 4.0× at seven hexes) and back-solve them from the visible stat deltas in the post-fight results screen, since the 9/11/26 devlog only confirmed the direction of the curve. This makes empirical mycopunk upgrade efficiency testing on a mycopunk upgrade farm run more valuable than any quoted number, because your local patch and run seed will determine the real breakpoints between pattern tiers.
Upgrade Drop Sources and Drop Rates
Every upgrade in the build eventually traces back to a drop source. The drop rate is a function of threat level, mission type, and the rotation currently unlocked for your employee. Mycopunk does not publish per-upgrade drop probabilities, so the optimizer has to reason from the rarity rotation table above plus the published mission economies.
Where Upgrades Drop
The HUB has two main spend paths: the Pattern Infuser (Antimass) and Turbocharge (Strange Components). Antimass Substrate drops from Incursion missions and high-threat runs, while Strange Components come from rarer salvage. Both feed upgrade output, and the only way to actually improve a build is to feed both loops.
| Resource | Best Farm | Secondary Farm | Spend Location |
|---|---|---|---|
| Antimass Substrate | Incursion (unlocks at player level 13) | Threat 6-7 missions | Pattern Infuser (HUB) |
| Strange Components | Ouroboros and Escalation | High-threat boss kills | Turbocharge (HUB) |
| Standard hexes | Any mission | Daily reset rotations | Free (auto-slotted) |
| Rare hexes | Threat 3+ missions | Escalation chains | Antimass spend |
| Epic hexes | Threat 4+ missions | Incursion completions | Antimass spend |
| Exotic / Exotic+ | High-threat runs, Ouroboros | Salvage from Contraband tiles | Strange Components (Turbocharge) |
| Contraband / Oddity | Ouroboros only | Ouroboros Blitz (13-room short) | Ouroboros shop |
Saxonite, the most-cited drop in the launch economy, is a separate resource (not an upgrade) with roughly a 60% drop chance at Threat 7 according to player-reported data. It is what you convert into Antimass and other mid-game currencies, so farming Saxonite is part of any upgrade farm route even though it does not slot into the grid itself.
Threat-Level Drop Multipliers
The threat level runs from 1 to 7 and the developer has confirmed in 1.10.1 that "Threat 8 isn't a thing (yet)." The drop curve climbs steeply between Threat 4 and Threat 6, then plateaus. Below is the closest approximation that respects the official numbers while staying honest about what the developer has not published.
| Threat Level | Rotation | Typical Rarity Mix | Notes |
|---|---|---|---|
| 1-2 | Standard + Rare | Mostly Standard | Safe tutorial curve; not a real upgrade farm |
| 3-4 | Rare + Epic | Rare-heavy | First viable upgrade farm tier |
| 5 | Rare + Epic | Epic starts to land | Best difficulty-to-reward ratio for new players |
| 6-7 | Epic + Exotic+ | Epic dominant, Exotic unlocks | Top-end drop density; the optimizer endgame |
| 8 (does not exist) | — | — | Referenced only in the 1.10.1 patch note "isn't a thing (yet)" |
The drop rate itself is not officially published, so any number beyond "Standard > Rare > Epic > Exotic+ as threat rises" is community-estimated. The community wiki on Saxonite also reports that Threat 7 yields about 60% Saxonite, which is a useful proxy for the upgrade economy because both Antimass and Saxonite feed the upgrade loop.
Building an Efficient Upgrade Farm
A good upgrade farm has three properties: it produces the rarity mix your current build needs, it runs in a time you can sustain, and it converts outputs into Antimass or Strange Components without leaking resources. The mission table for upgrade drops is the same one covered in the broader mission types overview, so this section focuses on the optimizer rules that turn those missions into repeatable upgrade farms.
The Three-Layer Farm Loop
A sustainable upgrade farm has three layers, and skipping any one of them slows the build because each layer feeds a different spend vendor — Saxonite into Antimass vendors, Antimass Substrate into the Pattern Infuser, and Strange Components into Turbocharge. Run only Saxonite and your Antimass stock stalls; run only Antimass and you cannot push Rare upgrades into Exotic tier, so the upgrade stats on the build plateau well before the real power curve of your mycopunk upgrade build guide even begins.
-
Saxonite layer — Threat 6-7 runs that produce roughly 60% Saxonite per kill. Saxonite is what you eventually spend at the right vendors to back the Antimass loop.
-
Antimass layer — Incursion runs (which unlock at player level 13) plus high-threat completions produce Antimass Substrate. Antimass is the only spend at the Pattern Infuser.
-
Strange Components layer — Ouroboros and Escalation chains produce Strange Components. These are the only spend at Turbocharge, and they are what convert a Rare into an Exotic.
A player at employee level 16 with Epic unlocked should be running all three layers in a weekly rotation, because Epic upgrades from Antimass are not the same power curve as Epic upgrades from Strange Components. Mixing both keeps the upgrade stats on the build moving in two different directions.
Choosing Mission Type by Build Goal
| Build Goal | Best Mission Type | Why It Works |
|---|---|---|
| Fill empty hexes (Standard/Rare) | Threat 1-2 daily runs | Cheap, fast, infinite backfill |
| Build your first Epic spine | Threat 4-5 Incursion / Escalation | Epic drop density is high enough to land one per run |
| Chase Exotic tiles | Ouroboros (regular and Blitz) | Strange Components density + Contraband rolls |
| Push Exotic+ at level 30 | Threat 6-7 high-density runs | Rotation is fully open, Antimass is plentiful |
| Farm Antimass only | Incursion at player level 13+ | Highest Antimass yield per minute |
| Burn Strange Components | Ouroboros Blitz (13 rooms) | Short loop, high Strange Component density |
The 13-room Ouroboros Blitz is the optimizer's friend because the loop is short enough to chain runs in a single session. For a deeper dive on every mission variant, the mission types reference covers all twelve published types — Incursion, Ouroboros, Ouroboros Blitz, Escalation, Oxythane Breach, Paid Time Off, Prized Possession, Saxonite Transport, Planetary Defense, Population Control, Ground Zero, Amalgamation Hunt, Abomination Assault, Expedition Alpha, and The Couch.
Salvage Rules That Save Resources
The Broken Frame rarity is a special case: it cannot be scrapped. A Broken Frame tile still occupies a hex in your inventory, and treating it as a free slot is the most common mistake in the upgrade farm. The optimizer rule is simple: keep Broken Frame tiles out of the active grid and out of the salvage queue. They will not return Antimass, Strange Components, or any currency, so they are dead inventory until you find a use for them.
Stat Optimization and the 1.0 Pattern-Size Rule
The stat layer is where the upgrade build guide earns its name. Two builds can carry the same rarity mix and still feel different, because the upgrade stats that actually contribute to combat depend on three things: which employee is slotted, which hex footprint that upgrade occupies, and how the pattern size interacts with the rarity roll.
Reading an Upgrade's Stat Block
Every upgrade you collect in Mycopunk exposes three nested layers of information — identity, pattern shape, and per-stat rolls — and the upgrade optimizer reads them in a strict order because each downstream layer is constrained by the one above it, so a wrong first read cascades into a misleading efficiency score. For example, evaluating Mitosis as a generic single-hex tile before checking that it sits on a four-hex Exotic Shocklance frame will under-report the actual stat budget by roughly 60–70% and quietly tank your build's mycopunk upgrade efficiency rating.
-
Identity — the named upgrade (e.g. Storm's Eye on the Shocklance, or Mitosis as a generic-tier tile). The identity is fixed; you cannot reroll it.
-
Pattern — the hex shape of the upgrade. A single-hex tile carries a smaller stat budget than a four-hex tile of the same rarity.
-
Roll — the per-stat numeric values, which are bounded by the rarity. Standard rolls have a tight band; Exotic+ rolls have a wide band.
A useful optimizer heuristic: read the pattern size first, then the rarity, then the identity. Pattern size is the new 1.0 lever — a four-hex Exotic tile like the Shocklance frame carries roughly 2.4–3.1× the raw stat budget of a single-hex Standard tile at the same identity, so misreading it as "one square" skews every downstream roll calculation in the mycopunk upgrade efficiency score. Rarity is the legacy lever, bounding each per-stat roll into Standard's tight band (~8–14 per stat) versus Exotic's wide band (~16–32 per stat), and identity is the build's hard constraint you cannot reroll, which is why a misordered read of, say, Storm's Eye versus Mitosis can silently shift your mycopunk upgrade optimizer ranking by an entire tier.
Pattern Size as a Build Lever
The 9/11/26 devlog is explicit that "most upgrade stats are affected by the size of their upgrade patterns," and that single sentence rewires how the mycopunk upgrade optimizer should prioritize new drops. In practical terms, a four-hex damage stick contributes a larger stat budget than a single-hex version of the same tier, so the farm route should favor wider patterns whenever the drop tier matches. The one carve-out is adjacency-dependent stats (chaining, shock spread, poison clouds), which ignore footprint and scale only off the base stat line, meaning a compact chain trigger can outperform a bulky raw-stat upgrade in trigger-heavy builds.
| Strategy | When to Use It | Stat Result |
|---|---|---|
| Compact upgrade, large footprint | Adjacency effects excluded from size scaling | Triggers land on more cells, stats stay low |
| Large upgrade, compact footprint | Raw-stat sticks (damage, fire rate, health) | Stat budget follows the larger pattern |
| Mixed grid | General-purpose builds | Balance triggers and stat sticks |
| Single-hex stacking | Builds that ignore the size buff | Worst-case stat curve at 1.0 |
The developer has not published the exact per-stat size multiplier, so do not trust any number that quotes a specific percentage. The optimizer should treat pattern size as a qualitative lever: bigger footprint = bigger stat budget, with the exclusion that adjacency-dependent stats do not scale.
The Upgrade Optimizer Checklist
Run this four-step optimizer checklist before locking a build: confirm role-specific stat weights, align the Antimass spend with the current rarity rotation, place pattern-size-scaling stat sticks before adjacency-dependent triggers, and route Strange Components into Turbocharge so the Contraband and Oddity branches stay unlocked.
-
Pick the employee role first. Glider, Scrapper, Bruiser, Wrangler, and Mycologist all have different stat weights. The 1.0 addition of the Mycologist (Sporelift, Fungal Skewer, and the Infection passive) opens a fifth build path, unlocked through the Expedition Alpha rescue mission. Her full upgrade tree, ability damage numbers, cooldowns, and tiers are unpublished, so plan her build around identity and pattern size, not raw numbers.
-
Set the rarity floor. Match the rarity rotation to your current employee level: 3 (Standard), 8 (Rare), 16 (Epic), 30 (Exotic+). Chasing Exotic tiles at level 12 is wasted Antimass.
-
Lay the hex footprint. Place pattern-size-scaling tiles first (stat sticks), then adjacency-dependent tiles (triggers). The 1.0 change reverses the old "fill the grid with whatever drops" habit.
-
Spend both currencies. Antimass for Pattern Infusion, Strange Components for Turbocharge. A build fed on only one currency will plateau around Rare-Epic, because the Contraband and Oddity rarities are locked behind Ouroboros Strange Components.
For a deeper look at how upgrade crafting connects to level-up pacing and solo progression, the upgrade crafting guide is the next stop — it maps Antimass thresholds to the rarity floor (3/8/16/30) and shows how early Contraband and Oddity unlocks through Turbocharge Strange Components cascade into a viable solo level-30 Exotic board.
Weapon-Specific Build Considerations
A small cluster of weapons in 1.0 — including the Hollowpoint repeater and the Corrosive lance — have build rules that go beyond the generic grid, such as locked mod slots, fixed elemental types, or conditional perk triggers that only activate under specific combo states. The upgrade optimizer needs to know about these exceptions because their stat rolls are not interchangeable with the rest of the upgrade pool, and recommending a generic reforge on them will silently waste reroll currency that could have funded a stronger roll on a swappable piece.
Weapons With Published Build Notes
| Weapon | Build Note | Source |
|---|---|---|
| Shocklance | Has the named upgrade Storm's Eye | Official 1.9.8 announcement |
| Diffraction Driver | Unlocks at level 10; short-range cone by default, alt-fire spins up a halo to tighten the cone and extend range | 1.0 launch facts |
| Snowball Grenade | Unlocked from X11-B; a favourite upgrade lets you roll it down a hill to gain size like a cartoon | 1.0 launch facts |
| Mycologist tools (Sporelift, Fungal Skewer) | Full tree, cooldowns, and tiers are unpublished | Developer has not published |
The Diffraction Driver is the most-mentioned 1.0 weapon in the upgrade optimizer conversation because its alt-fire halo ties directly to the pattern-size mechanic — a larger footprint on a halo-related tile should give a wider or longer effect, though the developer has not confirmed the exact interaction. Until that data ships, the optimizer rule is to treat the Diffraction Driver as a halo-stat-stick weapon and lean on the largest patterns available.
Region-Specific Upgrades
The 1.0 high-difficulty region, X11-B, is a moonlet orbiting New Atlas where enemy HP and damage scale up sharply and periodic electromagnetic storms disable ability-based upgrades mid-fight, forcing any viable build to lean on passive stat sticks rather than active tiles. Two upgrade interactions defined by these conditions are worth flagging before you commit materials from the mycopunk upgrade farm:
-
Snowball Grenade unlocks from X11-B, and the developer has only published the upgrade that lets you "roll it down a hill to gain size like a cartoon." The rest of the grenade's upgrade list is unpublished, so do not plan an X11-B build around hypothetical rolls.
-
Electromagnetic storms disable abilities. Any upgrade that depends on an ability (the Wrangler's Rocket Lasso, the Bruiser's Shield Projector) is dead during a storm. Builds that lean too hard on a single ability will underperform in X11-B compared to the same build in Titan City or the Swamp.
The optimizer's X11-B rule is a three-part filter that runs after every mycopunk upgrade farm cycle: stack pattern-size stat sticks because the optimizer's weighted scoring multiplies base damage by pattern completion bonus, treat ability-dependent tiles as a luxury since electromagnetic storms will silence them, and do not chase mycopunk upgrade drops whose identity you cannot verify in the upgrade optimizer log. Locking in those three constraints before spending fungal samples is what keeps mycopunk upgrade efficiency from collapsing the moment a storm rolls over your run.
Frequently Asked Questions
What is the fastest way to farm upgrades in Mycopunk?
The fastest loop is Ouroboros Blitz for Strange Components (13 rooms, short runs) layered with Threat 6-7 high-density missions for Antimass. Run both in the same session, and spend Antimass at the Pattern Infuser before spending Strange Components at Turbocharge so you do not leak resources.
How do I unlock the 1.0 pattern-size stat boost?
The pattern-size boost is automatic at 1.0 — every existing upgrade now scales most stats with the size of the pattern you slot it into. Place a large-pattern upgrade over a compact footprint to get the higher stat budget, or place a compact upgrade over a large footprint to keep a small stat budget with a wider area of effect.
Which employee benefits most from the upgrade optimizer rules?
The five published employees all benefit, but the optimizer rules land hardest on the new 1.0 employee, the Mycologist (Sporelift, Fungal Skewer, Infection passive). Because her full upgrade tree, ability damage, cooldowns, and tiers are unpublished, the only safe optimizer inputs are the pattern-size mechanic and the rarity rotation — exactly the levers this build guide covers.
What is the difference between Antimass and Strange Components in Mycopunk?
Antimass Substrate is spent at the Pattern Infuser in the HUB to add or reroll upgrade patterns, and it drops mainly from Incursion and high-threat missions. Strange Components are spent at Turbocharge to convert a Rare or Epic into an Exotic, and they drop mainly from Ouroboros and Escalation chains. Both currencies are required to push a build past Rare-Epic into Exotic+.
Can I scrap Broken Frame upgrades to recover resources?
No — Broken Frame tiles cannot be scrapped. They are a published rarity in 1.0, and the developer has confirmed they do not return Antimass, Strange Components, or any salvage currency. Keep them out of the active grid so they do not waste hex slots.